
Demo Creating a Login With Firebase and Angular
In this tutorial, we are going Larn how to handle Firebase Hallmark In Angular using Google'southward Cloud Firestore and Angularfire.
Most of the applications nosotros build require some kind of Authentication and the simplest and fastest manner to get started with that is past using the Firebase Firestore.
Firestore is a flexible, scalable database for mobile, web, and server development.
What y'all will acquire
In this article, yous volition acquire to develop a fully functioning authentication system in Athwart using Firestore.
Nosotros will exist using the official tool for Angular and Firebase integration – AngularFire.
AngularFire allows you to work with Deject Firestore, the new flagship database for mobile app development.
It improves on the successes of Real-time Database with a new, more intuitive data model. Cloud Firestore likewise features richer, faster queries and scales better than Realtime Database.
PREREQUISITES
In guild to follow forth with this tutorial please ensure that the latest version of Angular CLI is installed on your calculator. You lot also need a Google account to be able to sign in to Firebase Console, where yous will be creating the app which we will piece of work with, in this tutorial.
Create a new Athwart projection using the Athwart CLI
Incase you don't have the athwart CLI globally installed in your development machine, open up your terminal and type:
npm install -g @angular/cli Open up your final on your desktop and type this command to create a new Angular projection:
ng new Angularauth This will ideally have some time, depending on how fast your cyberspace is, and then be patient.
Creating a Firebase project
Once the project is created, the side by side thing to practice is create an app in Firebase, then navigate to the Firebase Console so click on Add Project to create a new project.
Give it a name, I'll telephone call mine AngularAuth, and then click on Create Project afterward.
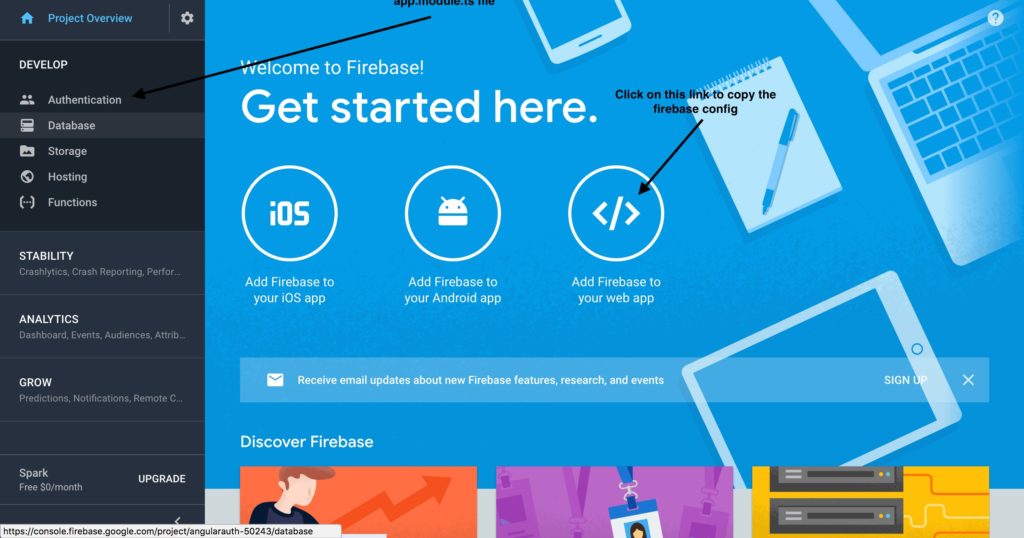
Now later on the project has been created, you will be redirected to the projection'south overview page, in that location you are meant to cull the option – Add Firebase to your spider web app.
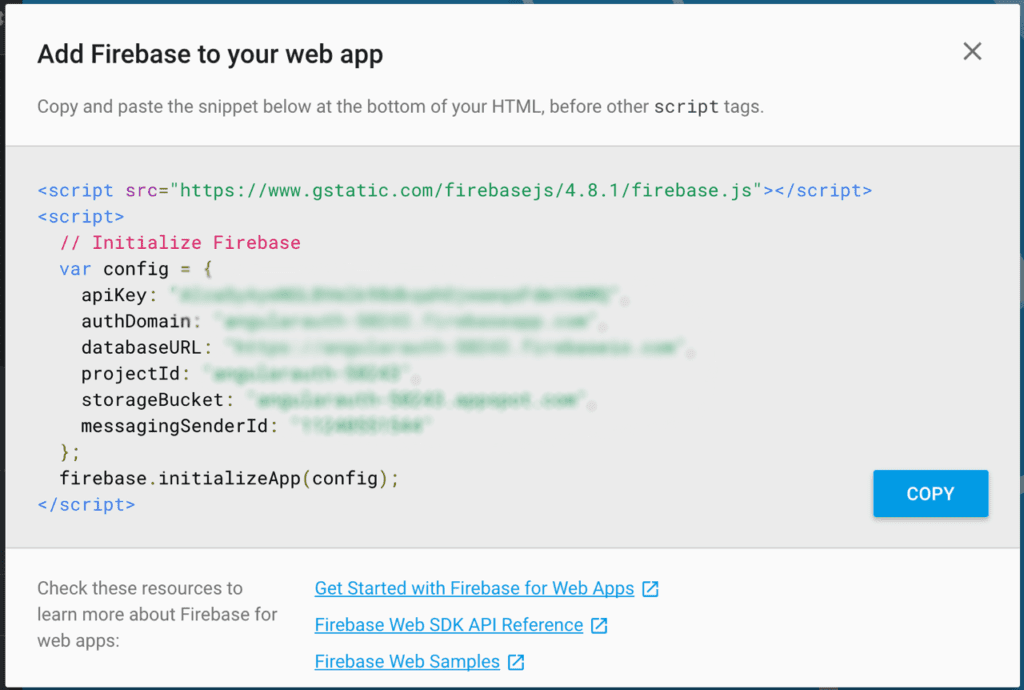
On clicking that, you lot will go a pop upwards with all the info such as the API key that you need to be able to interact with your newly created Firebase app from the Angular application That's it for at present with Firebase, let'southward go back to the Angular Projection to create some components.
Creating Necessary components
Nosotros demand a Homepage, Login folio, and Sign Up folio to showcase how our Authentication is working. So we need to create an Angular component for each of these pages.
ng g c Homepage ng grand c Loginpage ng g c SignUppage Now let u.s.a. run our app to confirm everything is working.
ng serve Now, let'southward go ahead and remove the default content that came with the new application. Navigate to src/app/app.component.html to see the code. Select all content of this file and delete it. When you hit relieve and cheque your browser now, the folio should be blank.
The app.component.html file at present becomes the new base/host for our homepage. Go alee and add the selector of the homepage component there.
<app-homepage> </app-homepage> The app-homepage is the selector for the homepage component we created earlier.
At present we volition install AngularFire in our project:
ng add together @athwart/burn Working with Firebase Hallmark In Angular
Now, with the installed npm packages we demand to configure our Firebase awarding to enable it to exist able to communicate with your Angular application.
Click on the Authentication link and choose sign in method on the peak tab subsequently calculation the firebaseConfig to app.module.ts file.
First, we will import the AngularFire modules to the app.module.ts file. My app.module.ts file looks similar this later the new config is added.
import { BrowserModule } from '@angular/platform-browser'; import { NgModule } from '@angular/cadre'; import { FormsModule } from '@angular/forms'; import { AngularFirestore } from '@angular/fire/firestore'; import { AngularFireAuthModule } from "@angular/burn/auth"; import { AppComponent } from './app.component'; import { HomepageComponent } from './homepage/homepage.component'; import { LoginComponent } from './login/login.component'; import { SignupComponent } from './signup/signup.component'; // Copy the firebaseConfig from your created project on the firebase console. Hither, click on the project name and so on the project dashboard, click on Add together firebase to your web app. Replace the values below with yours, values below volition non work for you because I accept removed some characters from it. const firebaseConfig = { apiKey: 'your_keyhere_jwaeqsFdm1hNMQ', authDomain: 'yourdomain.firebaseapp.com', databaseURL: 'https://angularauth-yourlinkhere.firebaseio.com', projectId: 'angularauth-yourIDHere', storageBucket: 'angularauth-Idhere.appspot.com', messagingSenderId: '11240551_IDhere' }; @NgModule({ declarations: [ AppComponent, HomepageComponent, LoginComponent, SignupComponent ], imports: [ BrowserModule, FormsModule, AngularFireModule.initializeApp(firebaseConfig), AngularFireAuthModule ], providers: [], bootstrap: [AppComponent] }) export class AppModule { } Next, we will set upwardly the Authentication methods, by clicking on the Authentication link described in the screenshot higher up. Once there, enable Sign-in for Email/Password and Google and then save. To enable for other providers you need an API fundamental and API secret. Which tin exist easily generated past visiting the developers' department of each of the providers.
Adjacent, click on the Database on the sidebar at Firebase and and so click on Endeavor FIRESTORE. And then click ENABLE.
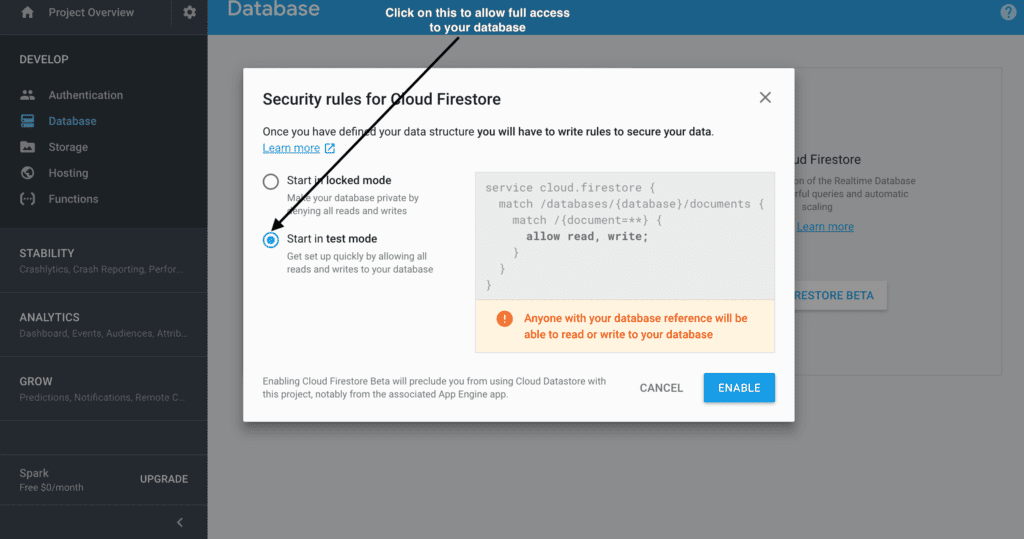
Upon creation of the Database, bank check the Rules tab and make sure the content is similar to this:
service cloud.firestore { lucifer /databases/{database}/documents { match /{document=**} { let read, write; } } } Now let'due south go ahead and use AngularFire and Firebase in our project. First, we demand to create a service file which will serve all the methods that nosotros demand to login and logout.
ng generate service auth At present, allow's go to the auth.service.ts file and add some code to information technology.
import { Injectable } from '@angular/core'; import { Router } from '@angular/router'; import { AngularFirestore } from '@angular/fire/firestore'; import * equally firebase from 'firebase/app'; import { Observable } from 'rxjs/Observable'; import 'rxjs/add/operator/switchMap'; @Injectable() export class AuthService { constructor( private afAuth: AngularFireAuth, private router: Router) {} login(email: cord, password: string) { this.afAuth.auth.signInWithEmailAndPassword(electronic mail, password) .and then(value => { console.log('Nice, information technology worked!'); this.router.navigateByUrl('/contour'); }) .take hold of(err => { panel.log('Something went wrong: ', err.bulletin); }); } emailSignup(email: string, password: string) { this.afAuth.auth.createUserWithEmailAndPassword(email, password) .then(value => { console.log('Sucess', value); this.router.navigateByUrl('/profile'); }) .catch(error => { console.log('Something went wrong: ', fault); }); } googleLogin() { const provider = new firebase.auth.GoogleAuthProvider(); return this.oAuthLogin(provider) .and then(value => { console.log('Sucess', value), this.router.navigateByUrl('/profile'); }) .catch(error => { panel.log('Something went incorrect: ', error); }); } logout() { this.afAuth.auth.signOut().then(() => { this.router.navigate(['/']); }); } private oAuthLogin(provider) { return this.afAuth.auth.signInWithPopup(provider); } } The first thing nosotros need to exercise after creating a Service method is to add it to the providers assortment in the app.module.ts file, then later on that nosotros need to create routes for the components we created before and also create two more than components, the EmailComponent and ProfileComponent. Apply the same method we used to create components earlier to create those components.
Side by side, we'll create the AppRoutingModule where we will create our routes. Create a file app-routing.module.ts in the src/app binder, then fill information technology up with the following content.
import { NgModule } from '@angular/cadre'; import { Routes, RouterModule } from '@athwart/router'; import { LoginComponent } from './login/login.component'; import { ProfileComponent } from './profile/profile.component'; import { SignupComponent } from './signup/signup.component'; import { EmailComponent } from './email/email.component'; const routes: Routes = [ { path: '', redirectTo: 'login', pathMatch: 'full' }, { path: 'login', component: LoginComponent }, { path: 'email-login', component: EmailComponent }, { path: 'signup', component: SignupComponent }, { path: 'profile', component: ProfileComponent } ]; @NgModule({ imports: [RouterModule.forRoot(routes)], exports: [RouterModule] }) export grade AppRoutingModule {} Now let'south go alee and piece of work in our LoginComponent file navigate to the login/login.component.ts , the method nosotros will use there is thegoogleLogin().
import { Component, OnInit } from '@athwart/core'; import { AuthService } from '../auth.service'; @Component({ selector: 'app-login', templateUrl: './login.component.html', styleUrls: ['./login.component.css'] }) export class LoginComponent implements OnInit { constructor(private authService: AuthService) { } ngOnInit() {} loginGoogle() { this.authService.googleLogin(); } } And fill up up the component file, login.component.html like so:
<div class="form-container"> <push (click)="loginGoogle()" grade="google">Login or Signup With Google</push> <button routerLink="/email-login" class="email">Email</button> <a routerLink="/signup" routerLinkActive="active" class="create-account-txt">No account? <strong>Create one here</strong></a> </div> Before nosotros become alee and verify that everything is working, nosotros need to change the content of the app.component.html file:
<app-homepage></app-homepage> with <code><router-outlet></router-outlet> Nosotros should also add together some styling to the class by editing the src/styles.css file, add together the following css code to it:
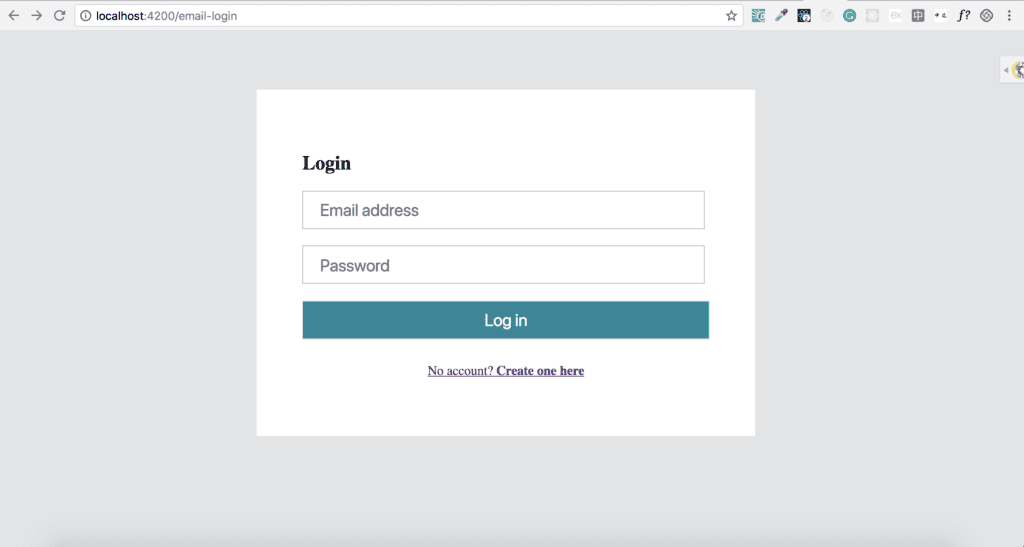
body { background: #E2E4E6; padding-top: 4em; } .form-container { background: white; padding: 3.5em; width: 500px; position: stock-still; left: 45%; margin-left: -250px; } button { padding: 0.5em; width: 100%; cursor: pointer; margin-lesser: 15px; font-size: i.3em; } .google { border: 1px solid #95989A; background: #fff; background-size: 25px; } .email { background: #ECECEC; background-size: 25px; } .create-account-txt { text-align: centre; display: block; margin: 15px 0; } .auth-btn { background: #3B8598; colour: white; } input.input-txt { groundwork: #fff !important; padding: 0.5em 1em; font-size: i.3em; edge: 1px solid #BBBBBB; width: ninety%; margin-bottom: 1em; } Now the login folio looks like this:

Log in with Google Account now works, next, nosotros will implement Logging in with Email and so after that, piece of work on the Signup form. Navigate to the email/electronic mail.component.ts file:
import { Component, OnInit } from '@angular/core'; import { AuthService } from '../auth.service'; @Component({ selector: 'app-e-mail', templateUrl: './email.component.html', styleUrls: ['./email.component.css'] }) export class EmailComponent implements OnInit { constructor( private authService: AuthService) { } ngOnInit() {} onSubmit(formData) { if (formData.valid) { console.log(formData.value); this.authService.login( formData.value.email, formData.value.password ); } } } Next, let'south navigate to the email/email.component.html file and add the post-obit:
<div class="class-container"> <h2>Login</h2> <grade #formData='ngForm' (ngSubmit)='onSubmit(formData)'> <input blazon="text" placeholder="Email address" (ngModel)="email" proper name="e-mail" class="input-txt" required> <input type="password" placeholder="Countersign" (ngModel)="password" name="password" class="input-txt" required> <push type="submit" [disabled]="!formData.valid" class="auth-btn">Log in</button> </form> <a routerLink="/signup" routerLinkActive="agile" class="create-account-txt">No account? <strong>Create one here</stiff></a> </div> The login form now looks like this:
Adjacent, let'south work on the Signup class and its component:
import { Component, OnInit } from '@angular/core'; import { AuthService } from '../auth.service'; @Component({ selector: 'app-signup', templateUrl: './signup.component.html', styleUrls: ['./signup.component.css'] }) consign class SignupComponent implements OnInit { constructor(public authService: AuthService) { } ngOnInit() {} onSubmit(formData) { if (formData.valid) { console.log(formData.value); this.authService.emailSignup( formData.value.email, formData.value.countersign ); } } } And then the template:
<div class="form-container"> <a routerLink="/login" id="goback">Login</a> <h2>Sign Upwards</h2> <form #formData='ngForm' (ngSubmit)="onSubmit(formData)"> <input type="text" placeholder="Email address" (ngModel)="electronic mail" proper noun="email" class="input-txt" required> <input type="password" placeholder="Password" (ngModel)="password" name="password" course="input-txt" required> <button type="submit" [disabled]="!formData.valid" form="auth-btn">Create Business relationship</button> </form> </div> Lastly, the contour component which is the simplest of all, there we just need to add a Sign Out push that will take the user back to the Login Page.
import { Component, OnInit } from '@angular/core'; import { AuthService } from '../auth.service'; @Component({ selector: 'app-contour', templateUrl: './profile.component.html', styleUrls: ['./profile.component.css'] }) export class ProfileComponent implements OnInit { constructor(public authService: AuthService) { } ngOnInit() {} signOut() { this.authService.logout(); } } p> Welcome to your hush-hush contour! </p> <button (click)="signOut()">Sign Out</push> Conclusion
At that place'due south withal room for improvement, nosotros tin can cheque the state of the current user and guard the contour page then that a stranger can't go to the User'south profile without Logging in. If you are reading this, you've probably navigated your way through this tutorial successfully. I hope you learned a few things about treatment Firebase Authentication In Athwart. Every article tin be made amend, so delight leave your suggestions and contributions in the comments below. If you take questions almost whatsoever of the steps, please practice also ask in the comments section below.
Demo Creating a Login With Firebase and Angular
DOWNLOAD HERE
Source: https://codesource.io/firebase-authentication-in-angular-using-angularfire/
Posted by: williamspeaske.blogspot.com